In 2010 I got tired of continuously having to wire up breadboard power supplies. I found I often wanted to just prototype something quickly with a few parts I had lying around, but I frequently gave up before starting because I was too lazy to fish out and wire up yet another LM317 or something. Thus, as is the fashion when nothing too serious is required for a benchtop power supply, I put together a small ATX power supply breakout box with an adjustable voltage regulator.
I began by planning out a simple circuit. I put a voltmeter on the adjustable voltage branch as well as an ammeter on the common ground:
![](https://blogger.googleusercontent.com/img/b/R29vZ2xl/AVvXsEisiIEazyfK_5VR4mK7LNQX7DrOJyJnuz6d5DIr6oozFWfM_5llj4Nm6CA9BBFsU_LnOHXOHnHr20arO_gALGdV748jJd-FV9tyxzXK_7Gne5oeoCXJnKyvmc3kP-M6D9ocq4GcOqNty6Zj/s640/Circuit.jpg) |
Circuit for the ATX power supply breakout box. |
I laid out the faceplate elements on cardboard to make sure things fit as intended:
![](https://blogger.googleusercontent.com/img/b/R29vZ2xl/AVvXsEh_fShag9yXjB8pd7qxSx89ZwpDEepNKFVVi_EmjOIfBh2k2vcB7HIDl3NZBaw5AJe3rhXTN4PMZH1Z0ynivBCfdYucElvCBVj4wBjHxIFzNQqxhyphenhyphendtvBmfkM_EludBPZ5CH-kU7fMPyYJl/s400/IMG_3902.JPG) |
Mocking up stuff on leftover cardboard. |
![](https://blogger.googleusercontent.com/img/b/R29vZ2xl/AVvXsEgnNNmG47HPXjX7iZrXqeVL1DcYAWdmjGeIjyEZkeMtGhpv8iGWMuEotpDw8i4hyphenhyphenhBZbENTbDbe2Qht-RU-xqWo2LkcSO8chMKsDOoc2P_CyPFzaR3R4oj_HiF3ayCg4Fly29ikbCRzYLfg/s400/IMG_3905.JPG) |
Cutting the cardboard to the correct dimensions. |
![](https://blogger.googleusercontent.com/img/b/R29vZ2xl/AVvXsEjuI2aHKMxll9Ysigh5byQEl6U0wyiaLCvG8oPlRGR_DnOspe1rRPJIKCQS3dqnvRiJzh-Fw2cEZgQ8Mwjnp_FUcXZE1oGOL57Uq4dQqcGUSDDLpWBBx45Q2OR43fvs4NsaUMPWIeHnlsGa/s400/IMG_3903.JPG) |
Final mockup. |
Then, I carefully transferred the markings to some acrylic sheets I had scored and snapped to size:
![](https://blogger.googleusercontent.com/img/b/R29vZ2xl/AVvXsEjolv3gpcc7SSWcOyFhy0kt_RGlZnMcflJzGFde0frLGlhN7zk278pxuV8G5mL5DH6FIXnUKnKRaiOZWXSvceBw_GPGGhd7Qk31E0KHWSFC6TlzedLRxly0Z60P47MVmgy5cujQHOlOv6-B/s400/IMG_4609.JPG) |
Transferring the layout markings from graph paper to acrylic faceplate. |
![](https://blogger.googleusercontent.com/img/b/R29vZ2xl/AVvXsEia5Ly0MVFjQJEX8KTmYEJtTWItM2QUdcRq5lnaarsn_cEWjZyYnLFLBhVGMFA14kUkMnb43FCbFamxJx9EsL1EndkSORLkRuMfeRaLsvE2OoxCeJ9_CmWdDzdG8A2EVLP40Spy81StynZF/s400/IMG_4610.JPG) |
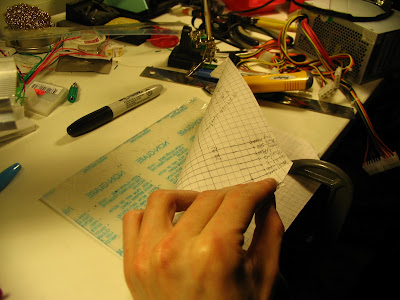
Making sure things line up. |
Then, I drilled all the required holes and openings on a drill press borrowed from my dad. I believe I used a sheet metal nibbler to square out the edges of the doorway-shaped holes, for the meters.
![](https://blogger.googleusercontent.com/img/b/R29vZ2xl/AVvXsEj3WIATAjSKBh8MKs0ja3Mq2ICC2IbkCRXNEG3LtY7f5GRtH5RgBl8Qk8Oa6q3zOQdr-Db6W84Nun_tBamKIajZ6zfh_oEG6RLyZFIdGKcAcLEWBH6SFtFpeL1VtYuJoOxTBSeIL-UZuNbJ/s400/IMG_0023.JPG) |
The cutouts. (This picture was actually taken after I removed the protective film, later on.) |
![](https://blogger.googleusercontent.com/img/b/R29vZ2xl/AVvXsEhxocEoo1kM7ZgoJCKuK2RMpqAKbxFz5H33Y3dDDVuGepNlfFVatXMjXTCpxvi8pxR5TV3Sd7e4Qb4OYzgffMQ8uR9BEXcTo8XIvoERU1cEcYXSCq0pM0zriUWnO0TSZU_2PNYTbxxSBQx3/s400/IMG_0024.JPG) |
Cutouts. |
Then, I test-fit everything to make sure things would line up properly, that there was enough space, etc.:
![](https://blogger.googleusercontent.com/img/b/R29vZ2xl/AVvXsEhnjTMvtvTI2C01uHw0RZl28wsZCsOf_tjoBzzaqZFLaw2VBIVtWDsShzAgk9VRM3ImtbzLU3-F-N2nnthWEJI1h8iNL0Li_Ban59VPfLzJxApjKz8yhYpS2z3xMt5LHarDHXcYsFAOoHgM/s400/IMG_0009.JPG) |
Testing for fit. |
![](https://blogger.googleusercontent.com/img/b/R29vZ2xl/AVvXsEgdA68MKtJcLZZW6F8p2GqWmDkNOLKnXy1FGRezNC0aZUXJRHUZCvgPrgN2uCr7AUyC175kP6ecoa3bMLsBRgoA_0yuiOYTi1obPVFR5YCqd2T6KZ6eRMEuIttKmL7rn-zQqfu46hD7s4Zt/s400/IMG_0010.JPG) |
Will it close properly? |
![](https://blogger.googleusercontent.com/img/b/R29vZ2xl/AVvXsEjlhNNczGaFmX6hio1zXr3Adwkyl4ppEXveHhidCZe1EX9C_wyMdzOQThXhC4Mv_QYlwjHKIJbBEFmBPgslLXy8RW7pRatBSNElJZCdAuUQ3p43IEeSQi_9qeJVCViORv39NTUDVw_q270j/s400/IMG_0019.JPG) |
Faceplate will look OK it seems. |
Since the test fit looked promising, I went ahead, peeled the protective film from the acrylic and assembled everything:
![](https://blogger.googleusercontent.com/img/b/R29vZ2xl/AVvXsEh0onSXkG2MUC6UihUPb78WxeVZdM-Plc-hp5pwn6aH_7pWd1I2aYUDJE0ONqePdM7Ph3diiQCNzM9oEC3HsjvNWVhU1Xzh5FhGku6Q_Gvk9Kj_FtPqJdCTdBJH07GlQGeAy3PpB8NB1Wno/s400/IMG_0025.JPG) |
Wiring up the faceplate. |
![](https://blogger.googleusercontent.com/img/b/R29vZ2xl/AVvXsEipb4-Sqo2ngGRTXiQxyDlQN4NKy9CCZ_8g2swrTjfIVXRAuZLCPY7Kj4iOzSGpSPNA1fM4cE_OZG-Qrb__nbTqbB-qGi4JjNEpcUv0ZjNV_dyFEUuVtltlnMGmOKcBieJkVRvreAUAnCjw/s400/IMG_0026.JPG) |
More faceplate action. |
![](https://blogger.googleusercontent.com/img/b/R29vZ2xl/AVvXsEiKfzGhEG-6tPRuumLiL5OZTd9tPI6d7LupXakTog8szZQu4_8dG4wr1Wtbw_FMl2mUe0RYKIaJkP0EyTJZs2BXABuQ4Qs-AWxtgUxN0xJ70btSwqUTKdFT4wmF_1sbdK6VSyzNfJ3P-wbH/s400/IMG_0027.JPG) |
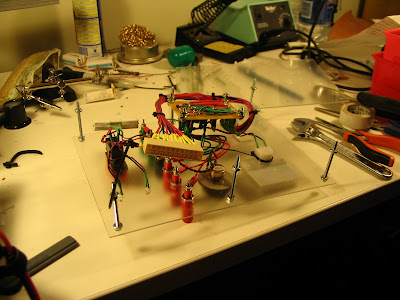
Adding the actual guts of the breakout box. |
And it turned out great:
![](https://blogger.googleusercontent.com/img/b/R29vZ2xl/AVvXsEi5qjzlZlJvJj0TGTu4mtOuHppqEebVaBr0sH9goVG_jL2_YkMzsujwaNbdELAIKpHK7daCR8woOds4GYLsguIw5CUNkaNPeZqdFALhkO7chEFOGjXgXfta8xq1iko1fKOAaa0PKOYDQZ6S/s400/IMG_0029.JPG) |
Looks good. |
![](https://blogger.googleusercontent.com/img/b/R29vZ2xl/AVvXsEh66k8GxmPqwWS8bFj77MCSECJxFiBzDqUQqKVSGiLOakyDZjuXUxASLd0bg9AZNHAVIC0MVp6fAXlBqyu8j-WupqnZtjcAx6nhYS1-6EekFemEZzOm-5mq9a27vjm1niCKho-8vKLt297h/s400/IMG_0030.JPG) |
From up high. |
![](https://blogger.googleusercontent.com/img/b/R29vZ2xl/AVvXsEiU0tSrJE8692tE_TkBmfBm9tvXg_GlE7nAJCI7UwJqcYTsZfbVazxCHe9Idd8HfnfXxtN89Ouhc1F2ZzoHug-RzHxlV3ryz4-_4pTONmUHggiT2fzGj0aBojZswTM60-lqoNDkFGdHEkIv/s400/IMG_0031.JPG) |
From the side |
![](https://blogger.googleusercontent.com/img/b/R29vZ2xl/AVvXsEj9SPjKFhcVLXllWpWs_w84BI3I7mDO3PGaDPXHPNuKMSHN8qcWU4HPxKt3xqT9wmo6NtWhLXTFJ1vQ3SnJrifFP17DnlzcuwyDg62fZMQFXHF-FlyjbvsUFtU_rNp_U84KUMbCScjmVHUD/s400/IMG_0032.JPG) |
Underside. |
![](https://blogger.googleusercontent.com/img/b/R29vZ2xl/AVvXsEicFN4CmBttvbxVSVOsargtbP6trAdxRKPCf0OpZTPiYB0pxsiPx_4uxRpfVXZ1SM3Q6kgVB3QUu8CzUqXpFg3hkPmEhpy9ofCtgmz65MLKCkEAvuvdqRtRyeAdxhg19wAWCcroqS-pe4wK/s400/IMG_0033.JPG) |
Off. |
![](https://blogger.googleusercontent.com/img/b/R29vZ2xl/AVvXsEiG6hbIhp28hHBdJ1EWCSmbEdmkaVPdHXjvEhmHPjlD3E5gImi89L4s9ifN52El1PiAYxSXFCBMNiswbMCrmmKVWPUgwik7T3-Io59tZbq61fGD1oCDbybLJ9_BnzK0W_mhXYlsnw_LSIlP/s400/IMG_0034.JPG) |
ATX supply on in standby, not delivering power yet. (That's the red LED.) |
![](https://blogger.googleusercontent.com/img/b/R29vZ2xl/AVvXsEh6YdksfP00jElAQXw5IkDiwK1S7rlmzbdbHbACNrHVHYSIAJ6_r_PhghWLvdNHlMpsSYO04G_Sw55zcH2C0D7V2RC2i9Rf6-n93GY7JJaCFsC7V6Ccd8lGtJZ7qWHEZbHLUp8joHk4ctfX/s640/IMG_0036.JPG) |
Final result, delivering power as indicated by the green LED. In case of panic just slam the safety cover shut. |
In the end, everything works great except the ammeter. That was a dumb mistake; I didn't test it in-circuit before putting everything in place, and I didn't realise that it required special wiring. (I never looked into it but I suspect it actually acts as a voltmeter, and you have to wire it up across a specified value of resistor for it to work properly.)
After making use of this thing for a couple of years, I might say a couple of things about the design:
- Though I didn't think the zipties around the back would be sufficient to hold the meters in place, they are still there in 2012 and the meters haven't moved.
- On the other hand, it was hard to find an inspired way to hold the molex breakout in place; it sucked on day one and it still does today. (As you might be able to tell from the pictures I built a sort of acrylic clamp. Won't do that again, the connector keeps slipping out, the acrylic bends, etc.)
- Instead of using three nuts per screw, I now use standoffs I cut myself from 1/4" plastic water piping.
- The safety cover on the switch came in handy many times. Because it's spring-loaded, it's much easier to slam the thing shut than to flick a pretty rigid toggle switch.
- Acrylic is too fragile a material for something that will be manhandled like this; though it hasn't happened yet, I'm always afraid I'm going to break the thing.
No comments:
Post a Comment